How to Make a Kaftan Kurti: Expert Guide to Timeless Craftsmanship
We are dedicated to helping you master the art of garment creation. In this comprehensive guide, we explain how to make a kaftan kurti—a unique fusion of traditional kaftan style and modern kurti design. Our step-by-step process covers everything from fabric selection to the final finishing touches. This detailed approach ensures that you produce a beautiful, high-quality garment that reflects both cultural heritage and contemporary fashion trends.
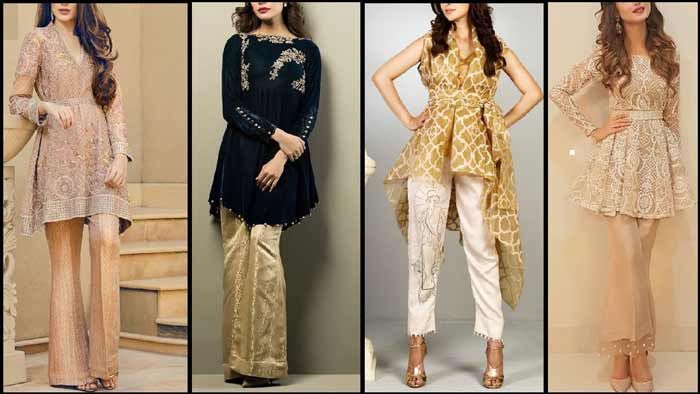
Understanding the Kaftan Kurti
What is a Kaftan Kurti?
A kaftan kurti combines the flowing elegance of a kaftan with the structured simplicity of a kurti. It is designed to be comfortable yet stylish, making it an ideal choice for various occasions. We believe that a well-crafted kaftan kurti is not only a piece of clothing but also a statement of art and heritage.
Cultural Significance and Modern Appeal
Historically, the kaftan was worn by both royalty and commoners, symbolizing grace and sophistication. Over time, the kurti evolved as a versatile garment suited for everyday wear. Today, merging these two styles results in a piece that is culturally rich and visually stunning. Our approach honors tradition while embracing modern techniques and design elements.
Materials and Tools
Selecting the Right Fabric
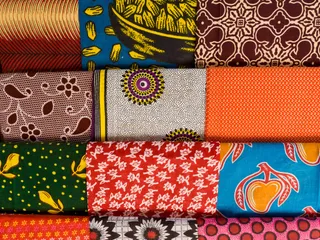
For a kaftan kurti, fabric choice is crucial. We recommend selecting a fabric that drapes well and offers comfort. Consider the following options:
- Cotton: Ideal for daily wear due to its breathability and ease of care.
- Chiffon: Provides a delicate, airy quality perfect for festive occasions.
- Silk: Delivers a luxurious finish suitable for elegant events.
- Linen: Offers a crisp, natural look that is especially suitable for warm climates.
Essential Tools
The tools required to make a kaftan kurti are as follows:
- Sewing Machine: Ensures precise and consistent stitching.
- Fabric Scissors: For clean, accurate cuts.
- Measuring Tape: To obtain accurate measurements.
- Pins and Fabric Chalk: To mark and secure fabric pieces.
- Iron: To press and smooth seams for a professional finish.
- Needles and Thread: High-quality thread that matches your fabric is essential.
Step-by-Step Process
Step 1: Design and Planning
Our design process begins with sketching your vision. We outline the style, length, and embellishment details of the kaftan kurti. A clear design plan helps in visualizing the final garment and ensures that all necessary elements are incorporated.
Step 2: Taking Accurate Measurements
Accurate measurements form the foundation of a well-fitted garment. We recommend measuring:
- Shoulder to Hem: This determines the overall length.
- Bust/Chest: Add extra allowance for a relaxed fit.
- Arm Length: Essential for designing comfortable sleeves.
- Waist and Hip: While the kurti is loose, these measurements ensure balance. Using a flexible measuring tape, record these dimensions carefully to guide your pattern creation.
Step 3: Creating the Pattern
With measurements in hand, we draft a pattern that includes:
- Front and Back Panels: These should create a flowing silhouette.
- Sleeve Patterns: Wide, loose sleeves that contribute to the garment’s relaxed feel.
- Neckline Design: Options such as round, V-shaped, or square can be chosen based on personal preference. Our pattern design should include seam allowances, typically 1 to 1.5 inches, to allow for comfortable stitching.
Step 4: Marking and Cutting the Fabric
Before cutting, we lay the fabric flat on a clean surface and align the pattern with the fabric grain. Using fabric chalk, we carefully mark the outlines of the pattern. This step ensures that every piece is cut accurately. Our cutting technique involves:
- Ensuring Seam Allowances: Leave extra fabric for stitching.
- Cutting Precisely: Use sharp fabric scissors to avoid fraying. Proper marking and cutting are crucial to achieving a neat, professional finish.
Step 5: Assembling the Garment
Now, we begin to assemble the kaftan kurti:
- Sewing the Side Seams: We join the front and back panels using a straight or zigzag stitch, ensuring the seams are even.
- Attaching the Sleeves: With the body assembled, we carefully sew the sleeves onto the garment. Accurate alignment is critical.
- Joining the Shoulder Seams: We combine the shoulder sections, ensuring symmetry and a smooth transition between panels. This phase is executed with precision to maintain the integrity of the design.
Step 6: Crafting the Neckline
The neckline is a defining feature of the kaftan kurti:
- Simple vs. Decorative: We decide whether to opt for a clean, simple edge or add a decorative facing.
- Embroidery and Lace: Enhancements like embroidery or lace trims can be added for an extra touch of elegance.
- Finishing the Edges: A neat finish is achieved by folding and stitching the neckline carefully. The final neckline reflects our commitment to quality and style.
Step 7: Hemming and Finishing Touches
Hemming is the process that gives the garment its polished look:
- Double-Fold Hem: We use a double-fold hem at the bottom and on the sleeves to ensure durability.
- Final Press: An iron is used to press the garment, smoothing out any imperfections. These finishing touches are essential to achieving a professional, retail-quality product.
Step 8: Adding Decorative Elements
Personalization elevates a standard kaftan kurti into a unique masterpiece:
- Embroidery: We incorporate intricate embroidery designs that reflect cultural motifs.
- Appliqués and Trims: Decorative elements such as lace, sequins, or tassels can be added to the edges or neckline.
- Custom Buttons or Zippers: Small details that enhance the overall design. Our creative choices during this stage allow the garment to express individual style.
Step 9: Final Inspection and Adjustments
Before declaring the project complete, we conduct a thorough inspection:
- Check Seams and Stitches: Ensure all seams are secure and even.
- Try-On Session: We recommend a fitting session to identify any necessary alterations.
- Make Adjustments: Minor tweaks may be needed to perfect the fit and overall appearance. This final review ensures that the kaftan kurti meets our high standards of craftsmanship.
Step 10: Styling and Wearing Your Kaftan Kurti
The final step is to style your creation:
- Pairing Options: We suggest pairing the kaftan kurti with leggings, jeggings, or traditional trousers.
- Accessorizing: Consider statement jewelry, a stylish belt, or an elegant handbag.
- Occasion Suitability: The versatile design makes it perfect for casual outings, cultural events, or festive celebrations. Styling completes the process and allows you to showcase your handmade garment with pride.
Benefits of Creating Your Own Kaftan Kurti
We believe that making your own garment offers numerous benefits:

- Creative Expression: Tailor your design to reflect personal style.
- Cost-Effectiveness: Save money by creating a custom piece rather than buying expensive ready-made clothing.
- Skill Development: Enhance your sewing and design skills through hands-on experience.
- Cultural Connection: Embrace traditional elements while integrating modern aesthetics. The satisfaction of wearing a garment you created yourself is unmatched and builds confidence in your abilities.
Tips for Success
Planning and Patience
A successful project begins with careful planning. We recommend:
- Detailed Design Sketches: Visualize your final product before beginning.
- Creating a Timeline: Allocate time for each step, ensuring you do not rush the process.
- Gathering All Materials: Ensure you have all the necessary tools and fabrics before starting. Patience during the creation process is key to achieving a high-quality result.
Learning and Experimentation
We encourage continuous learning:
- Experiment with Techniques: Try different stitching methods and decorative techniques.
- Seek Inspiration: Look at traditional designs and modern adaptations for ideas.
- Learn from Mistakes: Every project is a learning opportunity, and refining your skills is part of the journey. Our approach values both creativity and technical skill, resulting in a garment that is both unique and expertly made.
Maintaining Your Garment
Once your kaftan kurti is complete, proper care ensures longevity:
- Washing Instructions: Follow fabric care guidelines to maintain color and texture.
- Storage Tips: Store the garment in a cool, dry place to prevent damage.
- Regular Maintenance: Occasional repairs and touch-ups can extend the life of your creation. We believe that caring for your handmade garment is as important as creating it.
FAQs
1. What is the best fabric for a kaftan kurti?
We recommend lightweight and breathable fabrics such as cotton, chiffon, silk, or linen. Each fabric offers a unique drape and feel, suited to different occasions.
2. How do I ensure accurate measurements?
Using a flexible measuring tape and taking measurements from your body’s natural curves is key. Always add extra allowance for a comfortable, relaxed fit.
3. Can I personalize my kaftan kurti with decorative elements?
Yes, embellishments such as embroidery, lace, appliqués, and tassels can be added to customize your design and reflect your personal style.
4. What are some common challenges during construction?
Common challenges include ensuring accurate pattern alignment, maintaining consistent seam allowances, and achieving a neat finish at the neckline and hems. Careful planning and attention to detail help overcome these issues.
5. How long does it typically take to make a kaftan kurti?
The time required depends on your skill level and the complexity of the design. Generally, expect to spend several hours over multiple sessions to complete a high-quality garment.
6. Where can I learn more sewing techniques and get inspiration?
There are numerous online resources, including video tutorials and sewing blogs. We also recommend visiting local fabric stores for workshops and additional insights.
Conclusion
We are committed to guiding you through the process of making a kaftan kurti that is both elegant and comfortable. This comprehensive guide offers detailed, step-by-step instructions and expert tips that ensure your final product is a true reflection of your craftsmanship. By following our guide, you will not only create a beautiful garment but also gain valuable skills in design, sewing, and personal expression.


